| Outdoor Portrait can be quite tricky, because instead of you controlling the light, you have to adapt to the light.
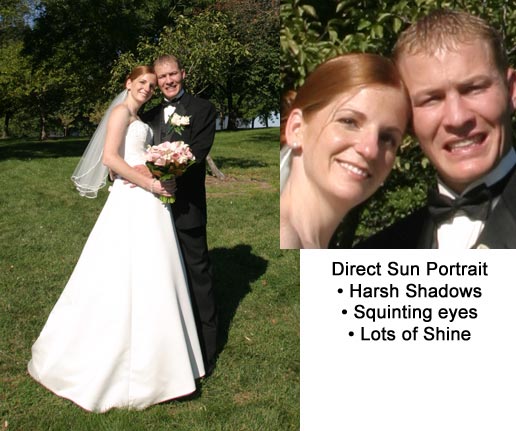
How NOT to do it: One of the easiest ways to explain some of the concepts of outdoor lighting is to show examples, especially examples of how NOT to do it! Taken by a prior associate, the image below is a classic example of what NOT to do. Too many people just pose the couple right out there in the direct sunlight. Not only do we have harsh shadows, but it's so bright that most people have trouble not squinting. And you're likely to get lots of shine and hot spots that may need to be fixed in Photoshop. Avoid direct sun, especially mid-day, if you can. Sometimes, you have to work in the direct sun and have no choice--I've added a few tips for that later down.

Not All Shade is equal: You're looking for shade where light falls across your subject from one side to the other. And you want the background to be of a similar lighting range as to compliment or highlight your subjects. You also want enough shade so that it's not speckled on the couple. In the image below, the lighting is reasonable on their faces. It's not perfect, but ok. But the the speckled hot spots on the bride and groom are distracting, and with digital they're bound to be blown out. Also, the background is busy. It'd be much nicer with a more solid tone, like full trees in the distance, etc.
Ah, that's better: This shot makes up for the others. Nice even light on their faces. The background is still a little distracting way back there, but at least the trees add an artistic element.
STEPS to Finding a Nice Outdoor Portrait Location...
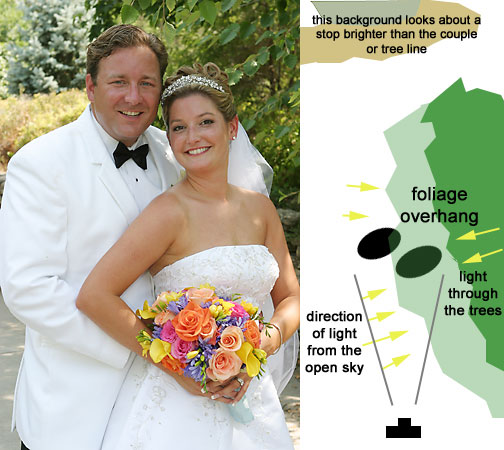
1. Look for an area where light comes in from the side instead of from directly above: You're looking for light that would mimic a studio light or soft box positioned to the side of a couple. So, look for places like trees or overhangs which block light from above, but allow an expanse of sky to bounce light in and across your subjects. If you place the couple at the edge of the overhang you'll see the light coming across their faces. The open sky to the side acts as a soft box
The image below shows a couple along a tree line where light is coming in from the left. The sun is actually to the right, but my main light is the open sky to the left. I'm shooting ALONG the tree line, not against it 'cause I want to the light coming across their faces. If I shot directly into the tree line, then I'd simply have a flat image. There's light all around in this image, with light even coming in through the trees, so the side lighting is not as noticeable, but you can see it pretty across the groom's face. The bride is a bit in the groom's shadow, but ok. You also see a few small highlights of sun coming through the trees. In this case it works almost as a hair light.

2. Look for your Background: There are two exposures planes in any portrait, the subject and the background. You can make any studio portrait look totally different just by altering the light on the background. The same is true for outdoor portraits, but, in this case, you have no control on the amount of light that is on your background. So, once you find a good location, look for the type of background you'd like to work with in conjunction with the subject's lighting. I prefer to use darker backgrounds like trees or foliage so that my subjects are of similar lighting or look a little brighter than the background. In this image, the actual tree line is my favored background here, but it's not long enough to go back the entire background. The lighter bush and tree further back will work since they are within a stop of the darker tree line.
Some people actually look for their background area first and then find an overhang area to place the couple in conjuction with the background. It works both ways.
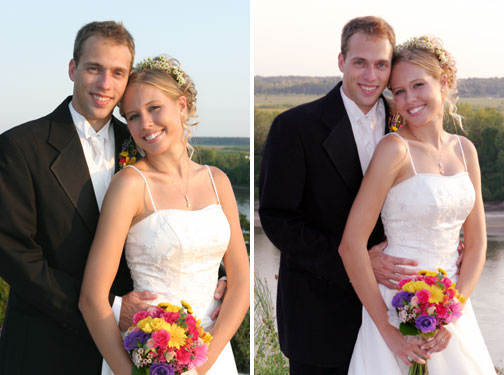
Stuck in the Sun: Sometimes all your have is sun, like for the images I took at this bluff top winery location. There were a few trees way off to the sides, but the bluff point was the 'cool' spot and I didn't want to drag them through the woods. So, I shot with what I had. The portraits benefit from being later in the day when the sun is to the side. In the early morning or late afternoon/evening, you can use the sun to your advantage by simply shooting at an angle to it. The right image below is shot with the sun slightly behind them to the right. The sun becomes a rim light. I'm exposing for the skins tones that are in the shadow so there are a few hotspots on the edges, but it's in the sun--we expect that. For the right image I used fill flash at about -1/2 stop.
For the image on the left, I turned them a little more in to the sun, but the sun is still directly to the right. I used fill flash at about a -1 stop. Because they aren't looking toward the sun, squinting isn't too bad. Also notice that since I'm stopped down and exposing for sun lit skin tones, I also have a better exposure of the sky! The groom has the best lighting in both shots really. I would have preferred the reverse pose of at least the left shot so that the bride wouldn't have been broad lit, but she may have been too much in the shadows then.

perpendicular to the sun -1 stop fill flash • sun slighty behind to right -1/2 stop fill flash
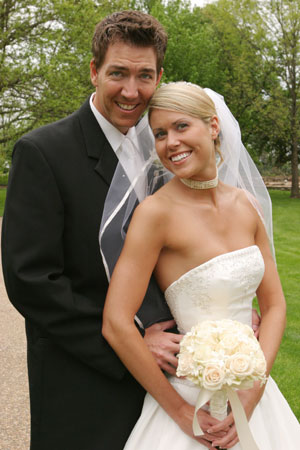
It Depends on the Weather: Of course, overcast skies can be an incredible advantage to any outdoor portrait shoot. The whole sky acts as a softbox instead of having a single point of light (the sun). You have much more to work with when clouds are blocking the direct sun! So, just as long as it's not raining, you'll get some great shots. Still you'll want to look for the general lighting directions. Images like that one below, can still suffer from shadows in the eye sockets (aka 'raccoon eyes'), but aren't as harsh. You can minimize eye socket shadow by having the couple turn their chin up just a bit. This bride and groom were both taller than me (and I'm not short!), so maybe a stop ladder would have helped. I'll opt for photoshop instead! :)

overcast day--shoot where you want!
|